gameSpaceLight is a Light version of gameSpace which is made public for FREE!
What's so special about gSL?
1. Its FREE
2. Native Support for importing and exporting many types of files. (Including Direct X .x format)
3. All objects can be exported WITH textures. So you just have to load them in DarkBASIC. That's It.
4. Major point is its Interface! So goddamned easy to use! A dumb like me in the area of drawing can also make complete models within just half an hour!
I tried Gmax first, but got frustrated because of Interface. I mean I knew what I wanted to do but couldn't do just because of silly interface!
Then I tried gSL and I found exactly what I needed!
The only limitation in the light version is PolyCount Limit to 5000 for Scene & 650 for Single Model, which is actually very good!
In 3D Modeling, High PolyCounts are used for animated movies only. For games, LowPolyCount is used. And its compatible with DarkBASIC. If you try to load models with high polycount, you will actually hang your PC within a minute! Even in a simple game you have to load hundreds of characters (enemies etc.) & entities (boxes, household items, buildings etc.). 100 objects with its full potential will be total 65000 poly! With a scene of 5000 polycount, means 70000 total. Not to mention Matrix!
So this limitation actually prepares a budget for our game. If we are get too carried away while creating a model, it will stop us automatically ;-)
(Even professional software like Maya or Max offers a similar option called budget for game modeling, in which you have to specify poly limit for each object which is essentially about 1000 at max for general 3d games)
How much is this 650 actually for a single model? Can I make a working animated 3D player?
You can actually make a working sexy model of Lara Croft using it ;-)
What about scene limit?
Well, if you make a Map or terrain using Matrix Editor (no matter how complicated you make) using the default settings, the polycount of your matrix will be 625.
(Note that size is not factor here. You can make 10 miles long tile with a single Polycount only.)
So you can make a scene with complexity almost 8 times more than that of a MatEdit Matrix.
Satisfied?
No? Then read this. You can load 60000 scenes at a time in darkbasic and position them continually or wherever you want. You can load 60000 characters, entities and enemies. Your program will still compile without an error, But of course, you will need a super computer to actually execute them without hanging. So stop making a fuss ;-)
Download gSL
You will be redirected to its website where first you have to fill a small form. You will get your own personal Serial/Key for FREE! mailed to the email you provided in that form!
Download it before company thinks of abandoning this project ;-)
Wednesday, April 18, 2007
Saturday, April 14, 2007
DarkBASIC LOGO Remover
DarkBASIC adds irritating logo saying "THIS PROGRAM IS MADE USING DARKBASIC".
How to remove it?
Here is the solution!
DarkBASIC LOGO REMOVER
How to remove it?
Here is the solution!
DarkBASIC LOGO REMOVER
Friday, April 13, 2007
Why should you choose DarkBASIC over DBPro?
Q - DarkBASIC Pro is new. DarkBASIC is old. Then why should I use the older version?
A - Because both are quite different languages! DarkBASIC Pro isn't actually some pro edition of DarkBASIC but its quite a variant of DarkBASIC Classic.
Game Development is a thing generally not taught in class rooms. You have to learn it your self. It means you have to read books and tutorials.
Now I don't think anybody would like to spend money on books for easy tool like DB! I myself would prefer browsing and using online free tutorials available to learn this thing.
Now here's the catch. 80% of code or tutorial you will stumble upon while surfing the net will be for DarkBASIC classic. You download something cool, run it in DBPro, and OOPS! ERROR! it says. Ultimately you will end up hating the language. Now you don't want to do that, do you?
Another reason is stability. In race of adding more functionality to DBPro, the stability has suffered. So if you want to try some of the new things, give pro a try, but if you want solid stable game, classic is the way to go.
Now another reason, which is more of a personal opinion rather than real reason, but let me share my feelings with you! It is the IDE. The first thing I was attracted to is the IDE. DBPro has so application-like-look, it just doesn't appeal to me. When I installed DB the first time (some years ago) I didn't know a thing about programming. But when I started making game I remembered that DarkBASIC is the thing to go for. And the part I really remembered was its GAME-LIKE interface. When you are making a game, you want your environment to be game-like too! But of course thats my opinion!
The main reason is, if you start learning with DBPro, you will require to put more efforts than you would have to had you chosen DarkBASIC.
SO FOLLOW MY ADVICE! GO FOR DARKBASIC!
Sunday, April 8, 2007
Fraps - Capture Video for your Games
Download Fraps
Want to make a video of your game and impress others? Why not? Download Fraps. Run It. Start any game. Press F9 to start recording. That's it!
And Size of the software? 0.72MB!
Yep! That's True!
Want to make a video of your game and impress others? Why not? Download Fraps. Run It. Start any game. Press F9 to start recording. That's it!
And Size of the software? 0.72MB!
Yep! That's True!
Friday, April 6, 2007
Tutorial #6 - Adding Effects
Sound Effects
load sound "path/filename",SoundID
play sound SoundID
loop sound SoundID
stop sound SoundID
These commands adds sounds in your game. Self explanatory.
2D Banners for HUD or Score Etc.
load image "Path/File",ImgID
paste image ImgID,X,Y
X & Y are 2D Co-Ordinates (1x1 to 640x480)
you can load various images displaying score or health, and paste them at appropriate place at appropriate time.
Tutorial #5 - Objects & Advanced Camera
Now that we have our map (matrix) and we know how to navigate, we can make the map alive by putting 3D objects at appropriate place. You can create 3D objects in GMax and export them to .X format.
Each object, when loaded in DarkBASIC, is completely white. It has no colors. But you can texture them using images exported at the time of exporting them.
In short, there are 3 steps
load object "path or filename",ObjID
load image "path or filename",ImgID
texture object ObjID,ImgID
ObjID & ImgID are also integers as MatrixID. All of them are different from each other, so you can use similar IDs for relevent files.
Ex:-
load object "car.x",1
load image "car.jpg",1
texture object 1,1
and you have a colored car!
They also have similar commands like camera. The only difference is that we have to provide the ID of the object we want to work with.
Move Object ObjID,Distance#
Turn Object Left ObjID,Angle#
Turn Object Right ObjID,Angle#
Pitch Object Up ObjID,Angle#
Pitch Object Down ObjID,Angle#
Object position x(ObjID)
Object position y(ObjID)
Object position z(ObjID)
Position Object ObjID,x#,y#,z#
And some additional commands like
hide object ObjID
show object ObjID
Now, say you are moving your car but your camera won't follow it, how to do that?
One way is to find the object positions and reposition your camera with values decreased by lets say 10 (Camera Distance) and y value increased by 5 (Camera Height).
But even after that it is not necessary that camera is facing the object itself. It may be facing some other direction. So we must rotate it in a manner that it points the object we are following.
For that we can use
Point Camera x#,y#,z#
whare the co-ordinates are those of the object.
This is the called logic.
Each object, when loaded in DarkBASIC, is completely white. It has no colors. But you can texture them using images exported at the time of exporting them.
In short, there are 3 steps
- Load Object
- Load Image
- Texture the Object with Image
load object "path or filename",ObjID
load image "path or filename",ImgID
texture object ObjID,ImgID
ObjID & ImgID are also integers as MatrixID. All of them are different from each other, so you can use similar IDs for relevent files.
Ex:-
load object "car.x",1
load image "car.jpg",1
texture object 1,1
and you have a colored car!
They also have similar commands like camera. The only difference is that we have to provide the ID of the object we want to work with.
Move Object ObjID,Distance#
Turn Object Left ObjID,Angle#
Turn Object Right ObjID,Angle#
Pitch Object Up ObjID,Angle#
Pitch Object Down ObjID,Angle#
Object position x(ObjID)
Object position y(ObjID)
Object position z(ObjID)
Position Object ObjID,x#,y#,z#
And some additional commands like
hide object ObjID
show object ObjID
Now, say you are moving your car but your camera won't follow it, how to do that?
One way is to find the object positions and reposition your camera with values decreased by lets say 10 (Camera Distance) and y value increased by 5 (Camera Height).
But even after that it is not necessary that camera is facing the object itself. It may be facing some other direction. So we must rotate it in a manner that it points the object we are following.
For that we can use
Point Camera x#,y#,z#
whare the co-ordinates are those of the object.
This is the called logic.
Tutorial #4 - Camera
Easiest part of all!
The camera is nothing but what you see on the screen.
You can move FWD & REV
You can turn LEFT & RIGHT
You can pitch UP & DOWN
All you have to do is to specify Angle# (0 to 360 Degree - Real Value) or Distance# (Real Value +Ve for FWD or -Ve for REV)
The following commands are self explanatory.
Move Camera Distance#
Turn Camera Left Angle#
Turn Camera Right Angle#
Pitch Camera Up Angle#
Pitch Camera Down Angle#
But what if you have to shift camera up & down vertically?
Well what we can do is find out current position of camera (X#,Y#,Z# co-ordinates) and RePosition camera with Y# co-ordinate with its value increased or decreased by the amount we need.
camera position x()
camera position y()
camera position z()
gives current co-ordinates in real value. We can store them in variables, lets suppose x#,y#,z#
Then use y# = y# + 10
And finally reposition using
Position Camera x#,y#,z#
You can use these commands as you wish to implement your logic.
How to keep camera always above the ground (matrix)?
Very important part because we want to walk, not float! What we have to do is to get x# & z# co-ordinates of camera. We won't bother with getting y# as it may be or may not be under the ground or at too much height above ground.
What we want to find is the ground level height (height of the tile your camera is standing on) at co-ordinates x# & z#. For that, we will use
get ground height (MatrixID,X# co-ordinates,Z# co-ordinates)
and store it in variable y#, and then reposition the camera.
The exact commands will be
x# = camera position x()
z# = camera position z()
y# = get ground height(1,x#,z#)
position camera x#,y#,z#
An Example
LoadMatrix("Proj1",1)
sync on
do
if upkey() = 1 then move camera 8
if downkey() = 1 then move camera -8
if rightkey() = 1 then turn camera right 4
if leftkey() = 1 then turn camera left 4
x# = camera position x()
z# = camera position z()
y# = get ground height(1,x#,z#)
position camera x#,y#,z#
sync
loop
Tutorial #3 - Basics of DarkBASIC
Naturally, after creating your first Matrix, you'll be eager to check it out. So instead of adding objects into over projects, we'll see some basics of DarkBASIC.
Open DarkBASIC (Start Menu -> Programs -> DarkBASIC -> DarkBASIC v1.13)
Open your project file from File->Open Menu. (The one you created in last chapter. DarkBASIC/Projects/Proj1/Proj1.dba)
You'll see some code, and after that a line stating
`Your Code Starts From Here
If you have noticed, those code has a line #include "LoadMatrix.dba"
(Remember the one we exported using MatrixRebuild?)
Now, let's write some code of our own. Let's say load the matrix we have made. (Proj1.MDF & _Proj1.BMP)
Loading Matrix in your Game
For that, insert a command after the line `Your Code Starts From Here
LoadMatrix("Proj1",1)
Is that it? Yes! Simple?
Now let's Compile the code using F4 and run the code using F5
We can see our matrix, but the program is terminated because we haven't added anything else.
Main Loop
Now you must keep one thing in mind. In general programming, we don't use infinite loop much often, but in Game Programming, all the main tasks are in infinite loop because the program has to check constantly which key is being pressed and act accordingly. To terminate this loop we use F12 (or the Escape Key if the game is complete and we are running it from an EXE).
Another thing. We must refresh the screen after each time this loop has been executed. Why? Suppose we are pressing FWD key, and your player is moving Forward. Now if we don't refresh the screen, your player will leave its trail, means he will be present at both positions, the old one the new one. hence, we will use the following loop as our main (like we use main() in c/c++)
sync on
do
.
.
.
.
sync
loop
sync on -> we are telling computer that we will refresh the screen ourself, and when we need.
do -> starting of main loop
loop -> end of main loop
... -> commands to be executed - the main logic (like what should be done when player presses a key)
sync -> refreshes the screen
Now our code is like following:
LoadMatrix("Proj1",1)
sync on
do
sync
loop
It will load the matrix, and then do nothing. You must use F12 to return to the editor.
Adding Logic
Logic can be added using If .. Then ..
(If Something happens Do something)
Syntax:-
If Then Else
OR
If
.
.
.
Else
.
.
.
EndIf
Conditions
To understand conditions, we must know variables and operators.
Variable Type Example
______________________
Integer i
Real r#
String st$
We need not define variables. We can use them directly.
Ex-
i = 10
r# = 2.12
st$ = "Constantin"
Of course, we must declare them if they are array or global variables.
Dim i(10)
Dim r#(2,4)
Dim st$(5)
etc. for arrays
Dim i(0)
Dim r#(0)
etc. if we want to use them globally in our program.
Operators are
+ Plus
- Minus
= Equal To
<> not Equal To
> Greater Than
>= Greater Than or Equal To
< Less Than
<= Less Than or Equal To
and AND
or OR
So, if we want to check whether the value of i is 10 or not, we simply use this code.
i = 0
if i = 10 then status$ = "True" else status$ = "False"
Later on we can use the value of status$ to determine further logic.
Advanced Logic
In 3D Game, our main logic will be to sort out what to do when a user presses certain key.
There are some in built functions which returns 1 if associated key is being pressed.
upkey()
downkey()
leftkey()
rightkey()
spacekey()
returnkey()
shiftkey()
controlkey()
Thus, we can work out some kind of logic in our main loop
if upkey() = 1 then CODE FOR MOVING CAMERA FORWARD
if downkey() = 1 then CODE FOR MOVING CAMERA REVERSE
etc.
For mouse there is a single command
MouseClick()
Which returns 1 for leftclick & 2 for rightclick
So, now we know how to make matrix, load it in our program. We also know how to implement logic. But to move camera, we will need to know some Camera Basics. which will be covered in the next chapter.
Open DarkBASIC (Start Menu -> Programs -> DarkBASIC -> DarkBASIC v1.13)
Open your project file from File->Open Menu. (The one you created in last chapter. DarkBASIC/Projects/Proj1/Proj1.dba)
You'll see some code, and after that a line stating
`Your Code Starts From Here
If you have noticed, those code has a line #include "LoadMatrix.dba"
(Remember the one we exported using MatrixRebuild?)
Now, let's write some code of our own. Let's say load the matrix we have made. (Proj1.MDF & _Proj1.BMP)
Loading Matrix in your Game
For that, insert a command after the line `Your Code Starts From Here
LoadMatrix("Proj1",1)
Is that it? Yes! Simple?
Now let's Compile the code using F4 and run the code using F5
We can see our matrix, but the program is terminated because we haven't added anything else.
Main Loop
Now you must keep one thing in mind. In general programming, we don't use infinite loop much often, but in Game Programming, all the main tasks are in infinite loop because the program has to check constantly which key is being pressed and act accordingly. To terminate this loop we use F12 (or the Escape Key if the game is complete and we are running it from an EXE).
Another thing. We must refresh the screen after each time this loop has been executed. Why? Suppose we are pressing FWD key, and your player is moving Forward. Now if we don't refresh the screen, your player will leave its trail, means he will be present at both positions, the old one the new one. hence, we will use the following loop as our main (like we use main() in c/c++)
sync on
do
.
.
.
.
sync
loop
sync on -> we are telling computer that we will refresh the screen ourself, and when we need.
do -> starting of main loop
loop -> end of main loop
... -> commands to be executed - the main logic (like what should be done when player presses a key)
sync -> refreshes the screen
Now our code is like following:
LoadMatrix("Proj1",1)
sync on
do
sync
loop
It will load the matrix, and then do nothing. You must use F12 to return to the editor.
Adding Logic
Logic can be added using If .. Then ..
(If Something happens Do something)
Syntax:-
If
OR
If
.
.
.
Else
.
.
.
EndIf
Conditions
To understand conditions, we must know variables and operators.
Variable Type Example
______________________
Integer i
Real r#
String st$
We need not define variables. We can use them directly.
Ex-
i = 10
r# = 2.12
st$ = "Constantin"
Of course, we must declare them if they are array or global variables.
Dim i(10)
Dim r#(2,4)
Dim st$(5)
etc. for arrays
Dim i(0)
Dim r#(0)
etc. if we want to use them globally in our program.
Operators are
+ Plus
- Minus
= Equal To
<> not Equal To
> Greater Than
>= Greater Than or Equal To
< Less Than
<= Less Than or Equal To
and AND
or OR
So, if we want to check whether the value of i is 10 or not, we simply use this code.
i = 0
if i = 10 then status$ = "True" else status$ = "False"
Later on we can use the value of status$ to determine further logic.
Advanced Logic
In 3D Game, our main logic will be to sort out what to do when a user presses certain key.
There are some in built functions which returns 1 if associated key is being pressed.
upkey()
downkey()
leftkey()
rightkey()
spacekey()
returnkey()
shiftkey()
controlkey()
Thus, we can work out some kind of logic in our main loop
if upkey() = 1 then CODE FOR MOVING CAMERA FORWARD
if downkey() = 1 then CODE FOR MOVING CAMERA REVERSE
etc.
For mouse there is a single command
MouseClick()
Which returns 1 for leftclick & 2 for rightclick
So, now we know how to make matrix, load it in our program. We also know how to implement logic. But to move camera, we will need to know some Camera Basics. which will be covered in the next chapter.
Tutorial #2 - Creating Matrix
This chapter covers using MatrixEditor & MatrixRebuild to make Matrix for your game.
Phase One - Initial Setting

We know that real ground does not look like a plain. Of course if you want it that way, it's your choice, but I want to make it look like a real ground.1st step is to make this plain imbalanced. i.e. All tiles has 0 height. We will change them.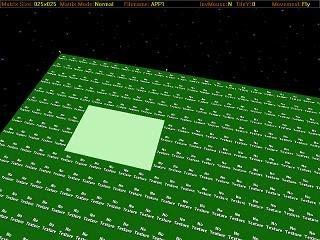

Phase Three - Texturing
Phase Four - Exporting
Now we will export this Matrix, so that DarkBASIC can import it and use it.
MatrixEditor
Phase One - Initial Setting
- Open Matrix Editor from Start Menu -> Programs -> DarkBASIC -> MatrixEditor v1.6b
- There will be 3 options. Choose appropriate option according to your needs. Right now choose 1.
- Create a New Matrix
- Load a Previous Matrix
- Continue The Last Matrix
- Type the name of your project (Name of the game you want to develop) and press enter. It will create a Project Workspace Folder in DarkBASIC\Project according to the name you provided.
- Select the textures you want. (They are in DarkBASIC\Tiles Folder. You can copy more bitmaps there manually. They will appear here.) After selecting required textures, press exit.

- Now What is the texture?
- It is basically an image you will use to paint the tiles of the matrix

- You will be asked to modify parameters. I would advise to use pixel width & depth 3000. i.e. a 3000x3000 pixel matrix. You can use smaller values, but for higher values, the number should be a multiple of 3000 for smoother performance. (Note that the default is 100000, so you have to change this manuallky. Click on value, type new value & press enter.)

- Now the Matrix Tiles are 25x25. Means 25 tiles horizontally & 25 vertically. Total 625 tiles. You can keep it as it is or you can change the amount. Depends upon how many tiles you want in your matrix.
- Suppose you keep 1x1, it means 1 tile. 2x2 means total 4 tiles.
- If you keep one tile only, you will be able to apply 1 texture.
- If you have more tiles, you can color different parts of your matrix differently. Like, suppose you are going to have a mountain and a lake in your matrix, you may want to texture them differently. So generally 25x25 serves purpose for current setup but if you use 6000x6000 pixels, u might want to set them to 60x60.
- Click OK and you will have your matrix set up. It looks like a square ground. It will not be textured by default, and the height of all tiles is set zero.
We know that real ground does not look like a plain. Of course if you want it that way, it's your choice, but I want to make it look like a real ground.1st step is to make this plain imbalanced. i.e. All tiles has 0 height. We will change them.
- To do that, 1st we need to select a tile. That can be done by arrow keys.
- If you wish to select a group of tiles, select Shift+Arrow Keys.
- Now, simply use + or - (NumPad) to increase or decrease height of a tile(s).

- The Fig. shows selected area (in this fig. the height has not been increased yet)
- After you are finished, if you are satisfied, start texturing, otherwise continue.
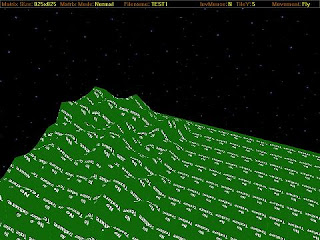
- Now lets say, we don't want to do this manually. So select an area to modify and press H. You will see a range of options. Do what you like. You can create mountain, lake, pyramid, wall etc. or you can even randomize the area.


Phase Three - Texturing
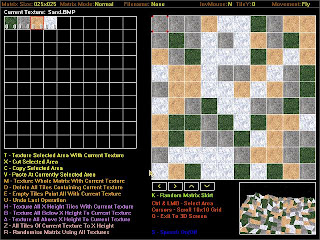
- Simply press T and you will be led to a texture editor which has a 2D view of the Matrix. Click on the texture and then click on the part you want to paint. Or you can use several auto options mentioned there.
- If you want to add more textures to your Project then
- Exit the Texture Mode
- Press E
- Add more textures
- Click on Exit
- Return to Texture Mode by pressing T

Phase Four - Exporting
Now we will export this Matrix, so that DarkBASIC can import it and use it.
- Press B to build the matrix. It will actually export the matrix & texture files. Suppose our project name is Proj1. It will export Proj1.MDF & _Proj1.BMP to Proj1 Folder in DarkBASIC\Projects.
- Before we can use it, we must rebuild it. For that we will have to use another tool MatrixRebuild.
MatrixRebuild
- Open Matrix Editor from Start Menu -> Programs -> DarkBASIC -> MatrixRebuild v1.0
- Type the name of the project you want to ReBuild (In this case Proj1) and press Enter
- This process will export 2 more files into your Project Folder. Proj1.dba & LoadMatrix.dba
- Now you are all set! This Proj1.dba will be your main program file. Open it from dark basic to do the actual programming.
- During the programming, whenever you want to load this Matrix, simply call the function LoadMatrix("ProjName",MatrixID).
- MatrixID is an integer identifier to identify this matrix. Whenever you want to use commands associated with this matrix, you will use this ID. Since, we generally use one matrix in one level, so your ID will be naturally 1.
- Example - LoadMatrix("Proj1",1)
Tutorial #1 - 3D Game Developement Basics

When we talk about 3D world in DarkBASIC, three things come into mind.
- A Matrix - It is the ground on which everything will be placed. It can be anything. Mountains, lakes or simple ground. They can be created using DarkBASIC itself (which will be very complicated) or by using a simple tool MatrixEditor (Made in DarkBASIC) which comes with the package on the Download page.
- Objects - All other things are objects. Enemies, Allies, Buildings, Trees, Vehicles, Guns, Bullets etc. Objects .X (Direct-X) files. You just have to load them and place them at appropriate place on your Matrix. Simple Objects can be made using DarkBASIC, but it's not worth for 3D Gaming. You better use either 3DS MAX (Which is costly and a big software) or GMax (Very Efficient, Same as 3Ds Max but especially made for Game Development. Definitely Recommended). Or you can download free 3ds/X objects from net by googling and directly load them in your game. (Be sure to give credits! Those guys deserve that!)
- Camera - The angle from which you see your 3D world. DarkBASIC has Built-In Camera. So no need to worry!
So now that you have made a Matrix(Ground), on which you have placed several objects (including your player if it is a Third Person Game). And you have Camera you view all that from any angle you like! So now what?
LOGIC!!!
The heart of programming is logic. Although it can be so simple with DarkBASIC taking care of most things, you still have to develop logic to make the game.
Ex:-
- What to do when user presses certain keys?
- What to do if an enemy is in your range?
- How to find whether there's an enemy in the range?
- Winning conditions
- Losing conditions
DarkBASIC With MatrixEditor & Matrix Rebuild
Download DarkBASIC v1.13 with Bundled Tools
Note
====
How to crack?
This is a special version. Just run the setup again if it says your trial period is over and it will work again. You dont have to uninstall. Just run the setup again which takes only 20 seconds! Thats it!
This isn't the case with the version available on www.darkbasic.com. It just expires!
There are some other benefits, too. You have a Matrix Editor & Matrix Rebuild Software bundled with this setup. So all you need to do is start making a game!
Enjoy!
Subscribe to:
Posts (Atom)